Mac - Switch the Different JAVA version on Mac
1.Firstly, you should specify your JAVA installed version in your mac, you could input this command into your computer.
$ /usr/libexec/java_home -V
Matching Java Virtual Machines (2):
    13, x86_64:	"Java SE 13"	/Library/Java/JavaVirtualMachines/jdk-13.jdk/Contents/Home
    1.8.0_241, x86_64:	"Java SE 8"	/Library/Java/JavaVirtualMachines/jdk1.8.0_241.jdk/Contents/Home
2.Next, visit the orcle website to install the JDK software NOT JRE in your mac, the default installation position is
/Library/JAVA/JavaVirtualMachines, you could obtain all the effective JDK components from there.3.Next, we should update the
~/.bash_profileto add the command into the default environment.$ vi ~/.bash_profile # Add below lines into the end of this file export JAVA_8_HOME="$(/usr/libexec/java_home -v 1.8)" export JAVA_13_HOME="$(/usr/libexec/java_home -v 13)" alias jdk8="export JAVA_HOME=$JAVA_8_HOME" alias jdk13="export JAVA_HOME=$JAVA_13_HOME" # indicate the default jdk version export JAVA_HOME=$JAVA_8_HOME4.Update the
~/.bash_profileand switch your JAVA version.$ source ~/.bash_profile $ jdk8 && java -version java version "1.8.0_241" Java(TM) SE Runtime Environment (build 1.8.0_241-b07) Java HotSpot(TM) 64-Bit Server VM (build 25.241-b07, mixed mode) $ jdk13 && java -version java version "13" 2019-09-17 Java(TM) SE Runtime Environment (build 13+33) Java HotSpot(TM) 64-Bit Server VM (build 13+33, mixed mode, sharing)
Install the
Spark(2.3.2)and Configure the Jupyter Notebook on local Machine(MAC)1.Go to this Link to download all the history Apache Spark software. Select one specific version you want.
2.Extract the downloaded file into the location
/usr/local, if you don’t know how to access to this path directly you can open thefinderand pressShift+Command+G, open the~/.bash_profileto add the Spark documents into the system path.$ vim ~/.bash_profile # Change the command to accord with your situation export SPARK_HOME=/usr/local/{spark-2.3.2-bin-hadoop2.6} export PATH="$PATH:$SPARK_HOME/bin:$PATH"3.Check the python version from your computer and You should add the the corresponding location information into the
~/.bash_profile$ which python3 {Your Default Python Installation Location} $ vim ~/.bash_profile export PYSPARK_PYTHON="{Your Default Python Installation}" # e.g. "/Library/Frameworks/Python.framework/Versions/3.5/bin/python3.5" export PYSPARK_DRIVER_PYTHON="{Your Default iPython Installation}" # e.g. "/Library/Frameworks/Python.framework/Versions/3.5/bin/ipython3" export PYSPARK_DRIVER_PYTHON_OPTS="notebook" alias pysbook='$SPARK_PATH/bin/pyspark'4.After that, you could open the
Jupyter Notebookbypysparkcommand orpysbook. You can alter the kernel as you like.5.Enjoy your
Pyspark!
Disscussion on the Command
qrshxon the HPC1.The details of the
qrshx:$ qrshx -P {Parameters} #gpu: GPU-equipped nodes (public) #rse: Research Software Engineering group's CPU-only nodes (restricted access) #rse-training: For training courses run by the Research Software Engineering group (restricted access) #insigneo-imsb: Insigneo Integrative Musculo-Skeletal Biomechanics (IMSB) subgroup's nodes (restricted access) #security: Computer Science Security project (restricted access) #cstest: CiCS testing only -pe openmp 4 #The numebr of cores #The amount of cores should be below the 4 -l rmem=16G #obtain the real memory -M {Your email address} -j y #normal and error outputs into a single file (the file above) -gpu=1 #the GPU numbers you want to use #https://docs.hpc.shef.ac.uk/en/latest/sharc/GPUComputingShARC.html#gpucomputing-sharc $./{my_programe} --num-cores=22.The command should accod with the JupyterHub Server interface information. If not, you will not be allowed to distribute the resource.
The Command
spark-submitThe
spark-submitscript in Spark’sbindirectory is used to launch applications on a cluster.For Python, you can use the
--py-filesargument ofspark-submitto add.py,.zipor.eggfiles to be distributed with your application.For General use, we could rely on this command to submit the jobs to the could clusters by requesting the resources.
Essential Parameters:
–master MASTER_URL: The master URL for the cluster.
There are two different modes:
- Spark On Mesos : mesos://host:port
- Spark On YARN: yarn://host:port
- local
–class: The entry point for your application (e.g.
org.apache.spark.examples.SparkPi)Only used for JAVA and Scala Application.
–py-files: The equivalent
--py-filesoption can be used to distribute.egg,.zipand.pylibraries to executors.

The Spark application can be interpretered into two parts: Driver Program and Application Master with the high level consisting of the SparkContext , Creating the RDDS and Performing the remain processes to achieve the final result.These transformations of RDDs are then translated into DAG and submitted to Scheduler to be executed on set of worker nodes.
The Spark application can handle with the user program request and separate process to excute user application, it can also creates SparkContext to control the cluster manager and schedule job execution.
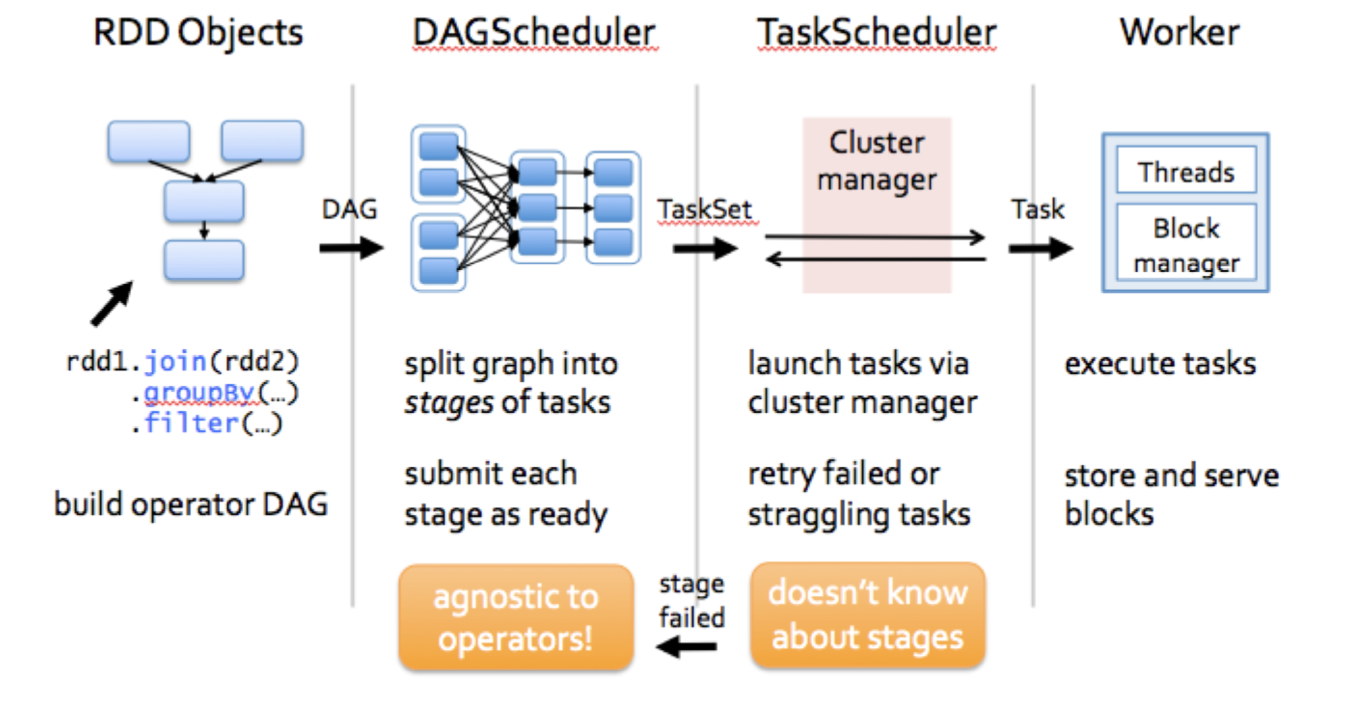
RDD could be regarded as the immutable parallel data structure with failure recovery possibilities. The Spark provides the APIs for materializations of data as well as for control over caching and partitioning of elements to optimize data placement. RDD stores information about its parents to optimize execution (via pipelining of operations) and recompute partition in case of failure. Each RDD is split into multiple partitions (similar pattern with smaller sets). which may be computed on different nodes of the cluster.
Fault-tolerant, is able to recomputer missing or damaged partitions due to node failures.
Data residing on multiple nodes in a cluster.
A collection of partitioned elements, e.g. tuples or other objects(that represent records of the data you work with)
RDD has five main properties in Pyspark:
#a list of partitions (e.g. splits in Hadoop)
#i.e. the data inside a RDD is partitioned (split into Partitions) and then distributed across nodes in a cluster(one partition per JVM that may not correspnd to a single node)
def getPartitions: Array[Partition]

#a list of dependencies on other RDDs
# Immutaable or Read-only
# - it does bot change once created and can be transformed using transformations to Rew RDD
def getDependencies: Seq[Dependency[_]]

#a function for computing each split
def compute(split: Partition, context: TaskContext): Iterator[T]

#(optional) a list of preferred locations to compute each split on
def getPreferredLocations(split: Partition): Seq[String] = Nil

//(optional) a partitioner for key-value RDDs
partitioner: Option[Partitioner] = None
Next, we will talk about the details and demenstration of functions in initialing pyspark RDD.
# Two main ways to create RDDs:
# 		+ load an external dataset(SQL/Hadoops)
# 		+ distributing a set of objects

from pyspark.sql import SparkSession
spark = SparkSession \
      .builder \
      .appName("Demo RDD Example") \
      .config("spark.some.config.option","some-value") \
      .master("local") \
      .getOrCreate()


sc = spark.sparkContext
df = spark.sparkContext.parallelize([(1,2,3,'a b c')]).toDF(['col1','col2','col3','col4'])

# output
+----+----+----+-----+
|col1|col2|col3| col4|
+----+----+----+-----+
|   1|   2|   3|a b c|
+----+----+----+-----+
The SparkSession is the entry point and can be created DataFrame as the input data frame.
The .builder allows users to construct a new SparkSession instance.
The .config could allow system to select a config about the application users created which can use this method are automatically propagated to both SparkConf and SparkSession’s own configuration. In other words, it is the the configuration of the Spark application, used to set various Spark parameters as key-value pairs.
from pyspark import SparkConf
new_instance = SparkConf()
spark = SparkSession.builder.config(new_instance)
The .master sets the Spark master URL to connect to, such as “local” to run locally, “local[4]” to run locally with 4 cores, or 'spark://master:7077' to run on a Spark standalone cluster.
For more details, you can click here to learn more actions and transformations about the RDD.
pyspark.sql.functions.split(str, pattern) [source]
DataFrame, and this function requires a returned variable instead of changing the original DataFrame.pyspark.sql.column.Column, we can’t use the normal pyspark function like collect() / show() to handle with this type’s variable. But we can use the pyspark.sql.Column.getItem(num)df = spark.createDataFrame([('slppp6.intermind.net - - [01/Aug/1995:00:00:11 -0400] "GET /history/skylab/skylab-small.gif HTTP/1.0" 200 9202',)],['value'])
split_logFile = split(df['value'], '- -')
pyspark.sql.DataFrame.select()
DataFrame, and the the parameters: cols – list of column names (string) or expressions (Column). If one of the column names is ‘*’, that column is expanded to include all columns in the current DataFrame.pyspark.sql.dataframe.DataFrame.pyspark.sql.DataFrame.withColumn(colName,col)
DataFrame will raise an error.Column expression for the new column.df = spark.createDataFrame([('slppp6.intermind.net - - [01/Aug/1995:00:00:11 -0400] "GET /history/skylab/skylab-small.gif HTTP/1.0" 200 9202',)],['value'])
split_logFile = df.split(df.value,r'- -')
new_logFile = new_object.withColumn('URL', split_logFile.getItem(0))
pyspark.sql.DataFrame.dropDuplicates()
select function.new_logFile.select('URL').dropDuplicates().count()
pyspark.sql.DataFrame.orderBy(*cols, **kwargs)
DataFrame sorted by the specified column(s).Column or column names to sort by.result = new_logFile.orderBy("count", ascending = False).take(1)
# the type of result is Row
result[0][0]
pyspark.sql.DataFrame.limit(num)
DataFramepyspark.sql.DataFrame.collect()
Row.{list_name[0]}pyspark.sql.Row
DataFrame. The fields in it can be accessed: row.key and row['key'].list, so if you want to assess the content of Row object, you could follow the rules of python List.DataFrame, you can use take() function to generate Row variable.>>>>result?
Type: list
String form: [Row(URL='edams.ksc.nasa.gov ', count=6530)]
Length: 1
Docstring:
list() -> new empty list
list(iterable) -> new list initialized from iterable's items
pyspark.sql.DataFrame.groupBy()
pyspark.sql.group.GroupedData. If you want to show the details of this data structure, you should convert this to DataFrame like count / avg / agg etc functions.v = sc.parallelize([(1,'a','bn'),(2,'b','mn'),(2,'a','nm')]).toDF(['num','rule','str'])
v.groupby('rule').count().collect()
# output
[Row(rule='b', count=1), Row(rule='a', count=2)]
pyspark.SparkContext.parallelize(c, numSlices=None)
list/array type.numSlices which indicates the number of slice in DataFrame.pyspark.sql.DataFrmae.filter()
Parameters:
condition – a Column of types.BooleanType or a string of SQL expression.
pyspark.RDD.map()
>>>>demo = spark.sparkContext.parallelize([1,2,3,4,5,6])
>>>>demo.map(lambda x: x+1).collect()
[2, 3, 4, 5, 6, 7]
pyspark.sql.DatFrame.regexp_extract(str,pattern,idx)
returned type is pyspark.sql.column.Column which can be used as the parameters of function select.
Parameters:
str: the name of the DataFrame’s Column and Object of Column
pattern: the regular expression in Java. usually starts with r'{_regx_}'
index: the index of the string from the regx.
For example, we use r'(\d+)(\c)(\d+)' to illustrate the meaning of this parameters.
In regx, the bracket () is used to match the pattern and obtain the results which follow this regulation.
The index of 0 the function will return all the corresponding mathes strings, in the example string which is (200 9202). Attention: the string includes the character space.
The index of 1 the function will return the first match pattern’s result which is (200). That indicates that the index should follow the sequence of the regx pattern.
>>>>df = spark.createDataFrame([('slppp6.intermind.net - - [01/Aug/1995:00:00:11 -0400] "GET /history/skylab/skylab-small.gif HTTP/1.0" 200 9202',)],['value'])
>>>>df.select(regexp_extract('value',r'(\d+)(\c)(\d+|-)',1)).collect()
# You can change this line with below line
# df.select(regexp_extract(df['value'],r'(\d+)\c(\d+|-)',1)).collect()
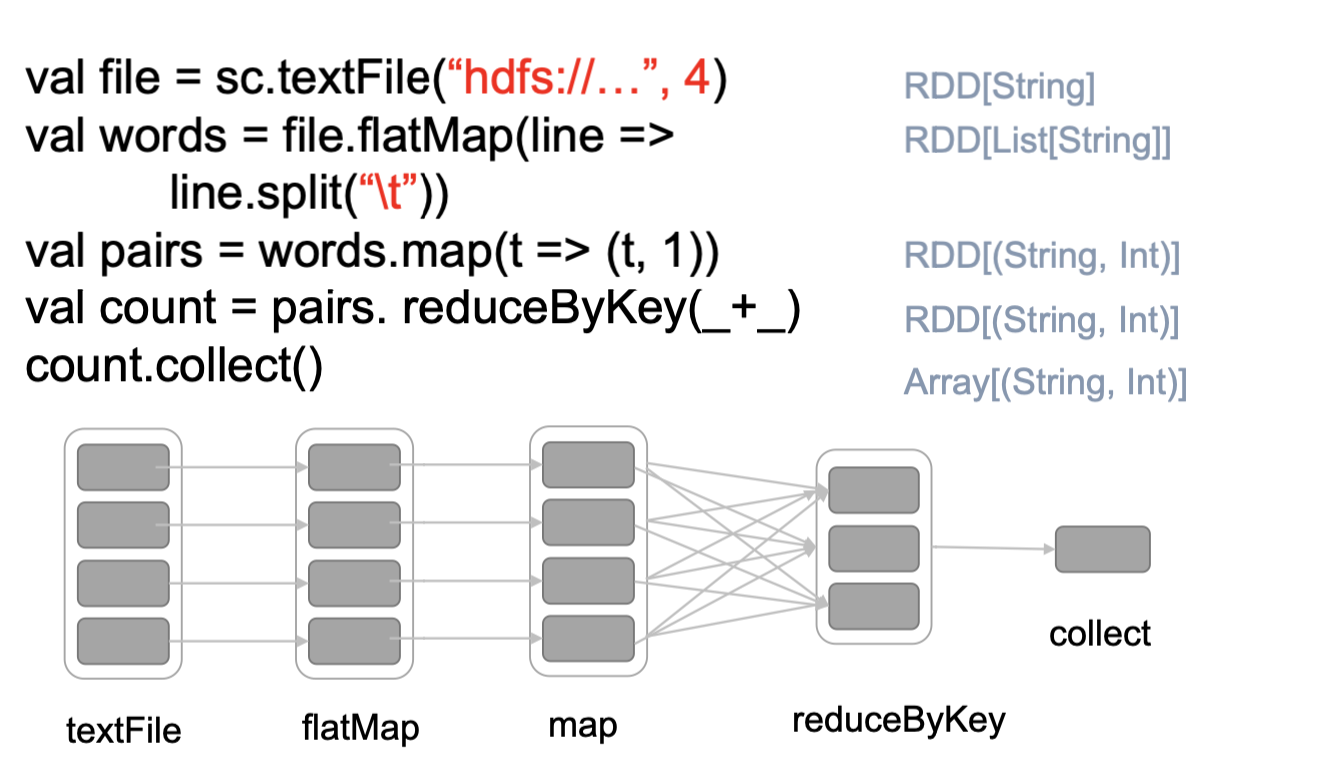
pyspark.RDD.reduceByKey(func, numPartitions=None, partitionFunc=<function portable_hash>)
fun: mapping function which indicates the operation of the RDD datastracture. It will generate hash-partitioned output with existing partitioner.numPartitions: Output will be partitioned with numPartitions partitions, or the default parallelism level if numPartitions is not specified. Default partitioner is hash-partition. Default value is HashPartitionerpartitioner: the partition function.# The Example about the partition
list_v = [("a",1),("b",1),("a",1)]
rdd = sc.parallelize(list_v)
#All the pair RDD operations take an optional second parameter for number of tasks
rdd.reduceByKey(_ + _, 5).collect()
# output
# [('a',2)('b',1)]
pyspark.RDD.distinct()
RDD, also you can use the DataFrame in one correct way.df = spark.sparkContext.parallelize([1,2,1])
df.distinct().collect()
# output
[1,2]
pyspark.RDD.persist()
This function can be assigned to set a new storage level if the RDD does not have a storage level set yet.
What’s the difference between the persist() and cache()?
cache() has only one default cache level, MEMORY_ONLY, and persist can set other cache levels according to the situation.
Fore more details, you can check the source of spark.
def cache(): this.type = persist()
def persist(): this.type = persist(StorageLevel.MEMORY_ONLY)
val lines = sc.textFile("hdfs://…")
val errors = lines.filter(_.startsWith(“Error”))
errors.persist()
errors.count()
//If you do errors.count() again, the file will be loaded again and computed again
//Persist will tell Spark to cache the data in memory, to reduce the data loading cost of further actions on the same data
//erros.persist() will do nothing. It is a lazy operation. But now the RDD says "read this file and then cache the contents" The action will trigger compution and data caching.
pyspark.RDD.foreach(func)
pyspark.Accumalator(aid,value,accm_para)
aid: the Identifier(ID) of this function, you can treat this like the unique index of this function.value: the initial value of this function.accm_para: the string to indicate the Accumalator.accum = sc.accumulator(0, "Example Accumulator")
sc.parallelize(range(0,10)).foreach(lambda x: accum.add(x))
accum.value
# output
55
MLlib allows easy combination of numerous algorithms into a single pipeline using standardized APIs for machine learning algorithms. The key concepts are:
A list of some of the available ML features is available here.
Clarification on whether Estimator is a transformer. See Estimators
In this part, I want to analyse the function and datastructure I met about the MLlib.
pyspark.ml.linalg.Vector.dense(*elements)
elements type can be indicated as python.lists or pyspark.sql.DataFramerdd = sc.parallelize([1,2])
Vector.dense(rdd)
# output
[1.0,2.0]
pyspark.RDD.randomSplit
DataFrame. Weights will be normalized if they don’t sum up to 1.0.DataFrame.pyspark.ml.regression import LinearRegression
>>>>df = spark.createDataFrame([
    (1.0, 2.0, Vectors.dense(1.0)),
    (0.0, 2.0, Vectors.sparse(1, [], []))], ["label", "weight", "features"])
>>>>lr = LinearRegression(maxIter=5, regParam=0.0, solver="normal", weightCol="weight")
>>>>model = lr.fit(df)
>>>>model.transorm(test_set)
pyspark.ml.evaluation.RegressionEvaluator()
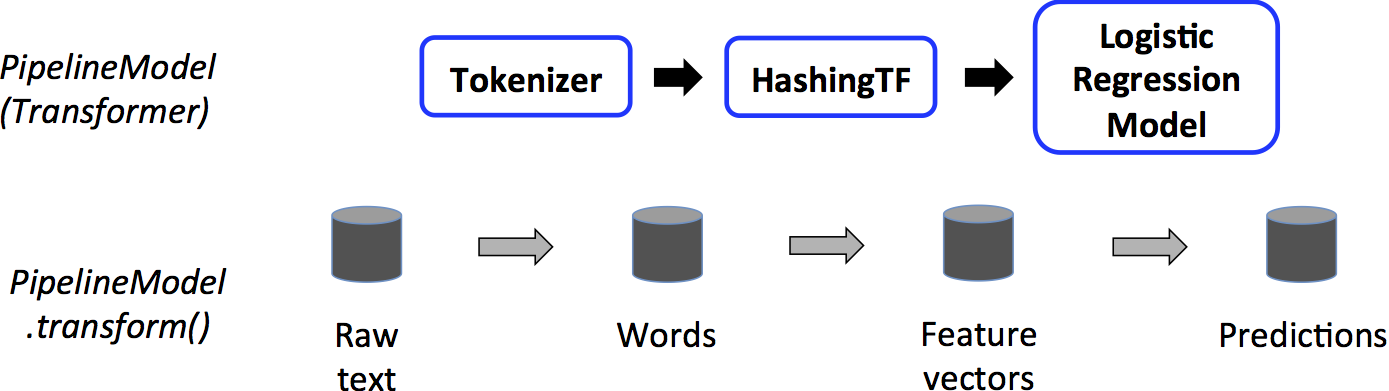
RegressionEvaluator.pyspark.ml.feature.Tokenizer (*inputCol=None*, *outputCol=None*)
>>>>df = spark.createDataFrame([("a b c",)], ["text"])
>>>>tokenizer = Tokenizer(inputCol="text", outputCol="words")
>>>>tokenizer.transform(df).head()
Row(text='a b c', words=['a', 'b', 'c'])
pyspark.ml.feature.HashingTF(numFeatures=262144, binary=False, inputCol=None*, outputCol=None)
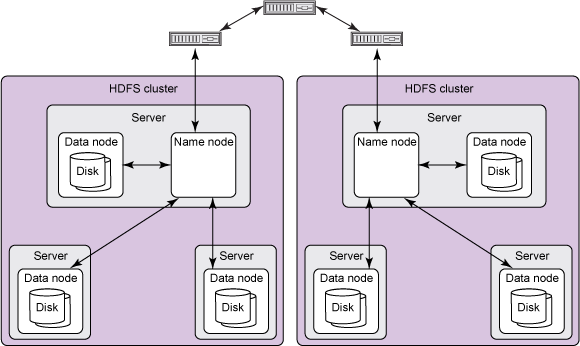
MurmurHash3_x86_32) to calculate the hash code value for the term object.HDFS is a distributed file system designed to store large files spread across multiple physical machines and hard drives. Spark is a tool for running distributed computations over large datasets. Spark is a successor to the popular Hadoop MapReduce computation framework. Together, Spark and HDFS offer powerful capabilites for writing simple code that can quickly compute over large amounts of data in parallel.
HDFS is comprised of interconnected clusters of nodes where files and directories reside. An HDFS cluster consists of a single node, known as a NameNode, that manages the file system namespace and regulates client access to files. In addition, data nodes (DataNodes) store data as blocks within files.
Within HDFS, a given name node manages file system namespace operations like opening, closing, and renaming files and directories. A name node also maps data blocks to data nodes, which handle read and write requests from HDFS clients. Data nodes also create, delete, and replicate data blocks according to instructions from the governing name node.
ML Pipelines: high-level APIs to create and tune machine learning pipelines.

General Description:
If you want to design a intelligent recommanded system to analyse the user’s behaviour, you can reply on this technology. This system can learn from the collected data and give better recommendations.
These techniques aim to fill in the missing entries of a user-item association matrix primarily based on the matrix itself.
Collaborative filtering in Pyspark - ALS
spark.ml currently supports model-based collaborative filtering, in which users and products are described by a small set of latent factors that can be used to predict missing entries, using the alternating least squares (ALS) function.
Eigenvalues and Eigenvectors:
\[\begin{equation} \mathbf{Ax = \lambda x} \end{equation}\]The A is the $n×n$ real symmetric matrix, $x$ is the $n$ dimension vector, we would define that the value $\lambda$ is the eigenvalues of the matrix $A$, and $x$ is the corresponding eigenvectors.
WHAT IS THE BENEFITS of Eigenvalues and Eigenvectors?
If we decompose the features of matrix $A$, we will onbtain the $n$ number of eigenvalues ${\lambda_1 \leq \lambda_2 \leq \lambda_3 \leq \dots \leq \lambda_n}$ and its eigenvalues are ${w_1,w_2,\dots,w_n}$. If these eigenvectors are irrelevant, the matrix $A$ can be represented by this feature decomposition:
The $W$ is the $n×n$ matrix composed by eigenvectors, and the result of $\sum{W^{-1}}$ is $n×n$ main diagonal matrix composed by the $N$ eigenvalues.
Eigenvector normalization
| Normalization of the $n$ eigenvector can make tbe $W$’s eigenvecots as the orthonormal basis. And It will satisfy $\left | \left | w_i\right | \right | _2 = 1 \quad w_i^Tw_i=1$. |
In this case, to perform feature decomposition, the matrix $A$ must be the a square matrix. If $A$ is not a square matrix, that means what if the rows and columns are not the same, can we still decompose the matrix?
Now here comes our SVD.
SVD:
Assume there is one matrix which is $m×n$ size, the SVD of the matrix can be represented by:
The $U$ is the $m×m$ matrix, and $\sum{}$ is the $m×n$ matrix which only have main diagonal’s values. The every element on the main diagonal is called a singular value. V is the $n×n$ matrix. U and V are unitary matrices.
Solve the SVD:
We use the multiplication of transpose of $A$ and matrix $A$ , and we will obtain a new $n×$n matrix $A^TA$. If the $A^TA$ is the square matrix, we will continue to do the eigenvalue decomposation. And the result of the eigenvalues and eigenvectors can satisfy this equation:
Now we can obtain the $n$ eigenvalues and $n$ eigenvectors of the matrix $A^TA$. We can use these eigenvectors to compose a $n×n$ matrix $V$. In general, we define the feature vectors of matrix $V$ as the right singular vectors.
Next, we rely on another distinct way to generate another square matrix, which is $m×m $ $AA^T$. We do the eigenvalues decomposation to obtain the another sets of the eigenvalues and eigenvectors. The eigenvectors can compose a $m×m$ matrix $U$, we can these eigenvectors as the left singular vectors.
The only matrix we havn’t obtained is the $\sum$, and the diagonal values on the matrix are all singular values, so we just calculate the every singular values.
\[A = U\sum{V^T} ⇒ AV = U\sum{V^T}V ⇒ AV=U\sum ⇒ Au_i = \sigma_iv_i ⇒ \sigma_i=Au_i/v_i\]From the previous steps, we can conclude that
\[\sigma_i = \sqrt{\lambda_i} ⇒ \sigma_i = \sqrt{A^TA}\]1.Cluster the data set into groups of different density.
2.Choose points in small cluster as candidate outliers.
3.Computer the distance between candidate points and non-candidate clusters.
4.If candidate points are far from all other non-candidate points, they are outlines.
Partitional Clustering:
Hierarchical Clustering:
Cluster the points in C to find the final centres
In pyspark, the developers could rely on the